Archive for the ‘Good Design’ Category

We’re updating SiteBuilder!

September 3, 2009

We conduct frequent user tests and review your feedback from the blog and our customer support center to plan our development, and we take it all into account (drop-down menus anyone? we hear you). We can’t talk about all that we’re planning, but we’re happy to announce that we’ve just finished an exciting update to our award-winning SiteBuilder website-building tool. Here’s product designer Jerry to tell you all about it –  Phil, Editor

We’re always trying to find ways to make it easier for you to build and maintain your websites, so based on your feedback we’re making some changes to SiteBuilder that we think will make it more efficient to use.
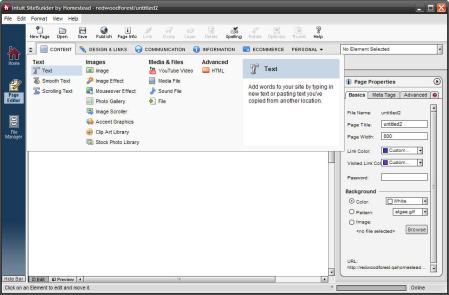
SiteBuilder website creating software - a new look

Visual Redesign

The first change is visual: when the update is made in the next few days, you’ll see that we’ve updated the icons in the toolbar at the top of SiteBuilder; same function, easier to identify icons. We’ve also refreshed the look of the element menus and shortcuts too, but that’s just the start for those…

Updated Shortcuts

SiteBuilder used to have four element shortcuts: Text, Image, Rectangle, and Site Navigation. By looking at which elements were used most frequently, we identified several that really should have a shortcut. So here’s the new list of element shortcuts: Text, Image, Photo Gallery, Media File, HTML, Rectangle, and PayPal Button.

SiteBuilder website creating software - element shortcuts

If you want some extra screen space to work on your website, you can hide and show the shortcut bar by clicking the arrow button.

To make room for this expanded list, we removed the shortcut for Site Navigation. Why? Because most people create their websites using one of our design gallery’s templates with a site navigation already built in. Of course, if you’re starting your site from scratch or need to add another site navigation menu to your site (for example, to create a footer of links), you can still find that element in SiteBuilder’s element category menu. Only now you’ll look for it in the new Design & Links category…

New Element Categories

One key thing we’re doing is reorganizing SiteBuilder’s website-building elements into new, more useful categories. As we developed new elements over time, our old categorization got outdated, with too many main categories and none with labels. We wanted to regroup elements in a more efficient way that would be easier to use.

The new menu organizes all elements in five main categories, each of which has more specific subcategories to make elements easier to find:

  • Content – Here’s where you’ll find elements for adding text, images, media content (like audio and video), and custom HTML to your site; everything you use to talk about your business in your own words, sounds, and images.
  • Design & Links – These elements create the structure of your site, including navigational structure and the overall visual design of your site.
  • Communication – This category has elements that let you interact with your customers, either through social media channels like your social networking site pages or a feed to your blog, or directly through email and chat. This category also has form elements that let you collect feedback and information from your customers.
  • Information – This category holds elements for information display like your location, time and date, and the weather.
  • E-Commerce – Anything related to selling through your website can be found here, like PayPal buttons and shopping carts, the SimpleStore add-on, and, if you have an e-commerce package, your Storefront.

Personal Elements

The five main categories hold elements that are best suited for building a professional-looking business website. The remaining elements have been given their own category called Personal Elements, because they’re often used on personal websites. If you want to access those elements, just select View > Show Personal Elements.

We know that there’ll be some adjustment for those of you who know the existing menus like the back of your hand, but we really believe that you’ll find the new categories make better sense and will be easier to learn and use.

Descriptions

Another goal of the redesign was to make it easier to understand what each element does without having to consult a help menu. In the new SiteBuilder, when you mouse over an element in the shortcuts bar or in the main menus, you’ll get a description of the element and some notes about how best to use it. If you want more detail you can always go to the Help tab (the one with the question mark on it) in the element’s properties editor, but now we’re putting the basics front and center so you can build more intuitively, and more quickly.

New Element

We’re also adding a new element called “Social Networking” to help you take advantage of the power of social networking sites to help you grow your business; we’ll be covering that in another post in a couple of days.

That’s it for now! We hope this refresh of SiteBuilder will make it even easier for you to build a great-looking website. We’ve scheduled the update for the next week, so stay tuned, and let us know what you think!

Website design tips from the pros

March 18, 2009

Some of you know that Homestead has a Design Services group that builds websites and online stores for members who want help with their designs. They’ve also analyzed a lot of other sites to suggest changes that business owners can make to maximize their results from the SearchLight marketing program. Because of what they do, they know what works well for websites and what doesn’t. The principles they follow can be useful to anyone building or maintaining a website, so I’ve invited Pamela to share some of their ideas with you – Rochelle.

Design concepts can change, but no matter how many sites we build for our members some principles remain the same. I’ve put together a list of some of them here that you can use as a guide for turning your own site into an efficient, professional online presence for your business.

Let’s start out with a couple of common website problems that can hurt your chances of converting a visitor to a customer:

  • Site is difficult to navigate — If visitors to your site can’t find their way to the information they need quickly, they’ll likely give up and look elsewhere.
  • Site looks unprofessional — If your site is cluttered or visually unappealing, it can be a turnoff to visitors and affect the way they perceive your company, no matter how successful your business actually is.

These problems are common but easy to fix:

  • Consider your site goals— What do you want your customer to do on your site? Whatever it is, make sure your home page highlights information that will help them do what you want, like your phone number if you want them to call you.
  • Optimize your layout — Recent studies show that visitors scan websites from the top left corner to the lower right. So the best place for your navigation menu is near the top of the page or vertically on the left, and make sure you keep key points about your business near the top so your visitors won’t have to scroll down to find it.
  • Keep your site design simple —Try using a standard design with a simple color scheme of 2-3 colors for all your pages, so that your logo, text, and background images have a consistent look no matter what page your customer is viewing. Visitors shouldn’t feel like they’re going to a completely different site when they navigate to another page; a site with an inconsistent look from page to page can undermine your company’s credibility.
  • Organize your site navigation — It’s easy to overload your navigation menu with too many buttons or links.  You don’t need to list every one of your pages in your navigation menu; think of it as a Table of Contents, rather than an Index. For example, if you have separate pages for different services you offer, try linking those individual service pages from one main Services page. A good basic navigation we use frequently is: Home, About Us, Services, Testimonials, and Contact Us.
  • Make your text work for you — Be concise, using just enough words for people to clearly understand what you offer without overwhelming them. Consider using bullet points to break up large amounts of text so your page will be easier to read, and use bold text sparingly; if your entire paragraph is bold, how will your visitors know what’s important?
  • Make your images look their best — Re-size your images with a photo editing tool before adding them to your site. There are many tools out there for free that can easily crop excess background so the focus of your image is clear.
  • Test your online store — If you sell things online, test your site by placing an order yourself and see what you’re asking your customers to do. Verify that the shipping and sales tax you’ve set up is correct, and that your return policies are clearly stated on your site.
  • Give visitors a reason to come back — Update your content often so that people see your site as a useful resource. One of the worst things you can do is leave outdated information on your site, like listing an event as upcoming when it has already passed. Offer your visitors fresh content and you’ll keep your site on their radar.

Remember, your website speaks for you so make sure it’s saying the right thing as efficiently as possible. If there’s one thing my team has learned, it’s that less is sometimes much, much more.

And be sure to check your Site Statistics regularly. It’s typical to see the number of visitors to your home page taper off as they navigate to other pages of your site. But if you see a severe drop-off, that’s a good sign that there’s something about your home page you need to fix so it stops turning visitors away before they can move further into your site.

I hope you find these tips helpful. Good luck with your site, and if you have any questions about design please let us know!

YouWant it, YouGot it: the new YouTube video element

November 3, 2008

If I’ve heard our members say it once I’ve heard it a thousand times: “When are you going to make it easier for me to add a YouTube video to my site?”  I really didn’t want to start on another thousand times, so… we built it!  We’ve just added a new YouTube element to SiteBuilder; here’s Jerry, the product designer responsible for it, to tell you about it — Rochelle.

You’ve probably noticed that websites now use lots of video. Services like YouTube have made it possible to add videos to a page by copying and pasting some HTML code into it. Some of you have already used SiteBuilder’s HTML Snippet element to add a video this way.  But it ain’t easy.  Adding HTML code can be kind of complicated, and frankly it isn’t the way we wanted to make you do it.

So we built you something I think you’ll like: the new YouTube element in SiteBuilder. No need for understanding or handling HTML code anymore–adding a video to your site is as easy as copying and pasting the URL of the YouTube video from your browser’s address bar.  You’ll also be able to see how the video player will fit in with the rest of your site on the SiteBuilder stage (the draft layout you see as you work on a web page in SiteBuilder).

Let’s try it out and add a video to a web page.  First, let’s drop the YouTube element onto our site by simply clicking it in the element menu under the “add images and files” element icon:

When you first drop your element on the SiteBuilder stage, it will look like this:

Now let’s find a video on YouTube to add to our page. To get there, go to www.youtube.com in your web browser, or just click the ‘YouTube’ link in the Properties Editor.  Let’s add my favorite video of the Internet Fairy. All we have to do is highlight or select the URL in the address bar and copy it.

You’ll find the URL you need in the address bar at the top of your screen:

We simply highlight that address from the YouTube page and copy it.  Then we go back to the page we’re building in SiteBuilder, and paste that URL into the ‘YouTube URL’ field in the properties editor in SiteBuilder.

You’ll notice that the element on the stage now shows us how the player will look on our web page.  We’ll be able to see the video itself when we’re done editing our element and we preview or publish our page.

We can control the way the video behaves, too.  There may be times when you’ll want a video to begin playing automatically as soon as a visitor gets to your page. In general, though, unless the video is the main focus of the page, you’ll probably want to let your visitors decide whether or not to watch the video. This is especially true if you have more than one video on the page. So for now we’ll leave the ‘Play Automatically’ option unchecked.

You can also choose whether or not to let YouTube suggest related videos to your visitors when they’ve finished watching your video. You’ve probably seen YouTube recommendations before; they look like this:

You get to decide if other content from YouTube would be appropriate for your purposes, or whether it would be distracting.  For now, let’s leave ‘Include Related Videos’ checked.

One of the best things about using the new YouTube element to add a video is that you can now customize the player’s appearance and see the changes directly on the stage.  For our example, let’s choose a different color for our player; how about dark blue:

Here’s how that will look:

We can also add a border of the same color to outline the player more:

And then we can preview our work; notice that the video plays right on the stage:

If we like what we see, all we have to do now is publish it:

And that’s it!  Adding a video is now just a simple copy and paste from your browser to SiteBuilder. Give it a spin; I recommend starting with Ninja Cat, one of my personal favorites: [http://www.youtube.com/watch?v=muLIPWjks_M].  Have fun!

SEO tips for website builders – Review of Samantha Ostergaard Yoga

September 12, 2008

Our tips on Search Engine Optimization, or SEO, are among our most popular, so we asked David to pick another Homestead website customer for an SEO review.  Up this time: Samantha Ostergaard Yoga Therapy.  These tips are specifically written for that site, but the fundamentals used apply to everyone.  Happy SEO’ing! – Rochelle.

Hello again!  We’ve selected Samantha Ostergaard for our next Search Engine Optimization case study.  Samantha is a Homestead customer based in San Francisco, where she specializes in yoga therapy.

We’ve covered a lot of SEO basics in my previous posts, first with SEO checkup – Luminous Day Spa, then with Make your website search engine friendly – 3 tips for Milton Ridge.  For this post I thought I’d concentrate this entry on some slightly more advanced SEO techniques that can really help Samantha’s site, and yours.

Keyword choice

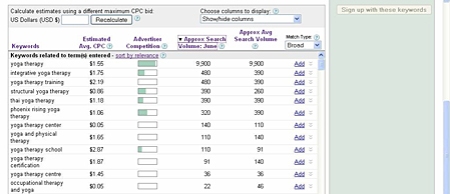
For her title tag on the front page, Samantha chose ‘yoga therapy’ as her main keyword.  There’s a really useful tool I like to use for researching how popular different keyword choices are online called the Google AdWords Keyword Tool.  It can give you advice on what keywords to consider, and now it even tells you the number of searches that were made on each!

Using that tool, this is what we find:

Google Keyword analysis for 'yoga therapy'

Keyword analysis - yoga therapy

‘Yoga therapy’ seems to be a highly competitive word, meaning that you’d have a lot of competition from other websites for people searching for that word or phrase.  What does that mean for you?  That it would be hard to stand out of the crowd of competing sites if you optimized for that phrase.

Instead, ‘integrative yoga therapy’ or ‘yoga therapy training’ might be better keywords—less competition, and still quite descriptive:

Keyword analysis - integrative yoga

Keyword analysis - integrative yoga

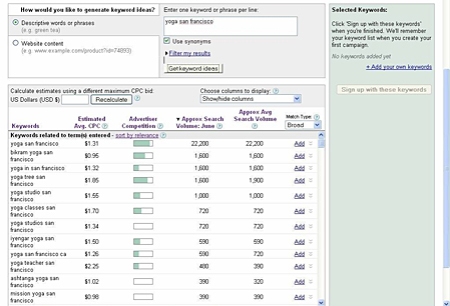
Notice that competition for ‘yoga san francisco’ is relatively fierce, but dramatically less so for a semantic version – ‘yoga in san francisco’.

Looking at Samantha’s website with this knowledge in mind, we recommend that she optimize it for this keyword string: ‘integrative yoga in san francisco ca’:

  • This works well as a description for what she has to offer, which will help get her more qualified traffic.
  • By using that string she can get her traffic from multiple keyword strings (‘yoga in san francisco’, ‘integrative yoga’ and ‘yoga san francisco ca’).
  • At the very least, we recommend that Samantha change her title tag to: ‘Samantha Ostergaard | Integrative Yoga In San Francisco CA’.

Getting links

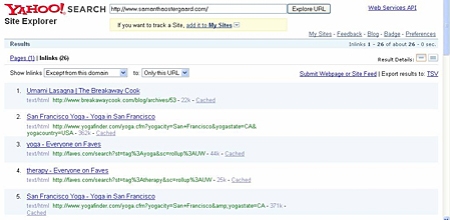
I next checked Samantha’s backlinks (incoming links to her site) using Yahoo! Site Explorer, and got these results:

Sites linking to Samantha's site

Inbound links

When I checked she had only 26 external links, mostly from faves.com and yogafinder.com. Samantha definitely needs more links, so we recommend she list her site in these directories: Yahoo Directory, Business.com, Best of the Web, Joe Ant, and the Intuit Business Directory (of course).

Remember, all links are not made equal. A link from each of the domains above is equivalent to a handful of links from smaller sites.  Always try to get a link from high-traffic, high-trust domains, or from sites that cover the same topic as your business.

Another note: while you have to pay for these links, they don’t guarantee inclusion. Your site must be professional and well-made. This is why the search engines trust them.

Get more links by participating in topical sites

As I mentioned above, links from smaller sites that are topically similar to yours are pretty good too.  To get links from these places, look for community sites where you can start engaging and participating:

  • With blogs, you can start by commenting on posts.  While links in the comments are usually not followed by search engines, they do tend to attract some traffic.  More importantly, commenting will get you noticed and hopefully featured in a post in the future.
  • With forums, your membership (and your reputation) establishes over time. Once it does, you can add a link to your own site on your forum signature.

How do you find these sites?  A simple Google search for ‘yoga forums’ or ‘yoga blogs’ is often sufficient. Another variation is using the inurl: command, which can help identify which URLs in use have certain words contained in them.  For example, if we do a Google search for ‘inurl:forum yoga’ and ‘inurl:blog yoga’, we’ll find examples of yoga sites that have ‘forum’ or ‘blog’ in their urls, which indicate that they might be yoga forums or blogs. Look them up, and see if you can participate in their communities.

Try it yourself

With just these few simple steps Samantha can increase the traffic to her website, which is always good for business.  Try these tips yourself, and see if you can’t raise the profile of your own site!

Making a mailing list, checking it twice…

August 5, 2008

After writing about the form elements a couple of weeks ago, a few people at the office suggested that I write about the mailing list elements as well. If you have a domain with email service, creating a mailing list is an excellent and easy way to keep your visitors informed about your business, club or group, and is a good tool to get them more involved as well.

Mailing List Overview

It’s easy to set up a mailing list for your website. In fact, you can set up as many mailing lists as you like. Basically, a mailing list is a collection of names which you can use to send information to multiple recipients at the same time.

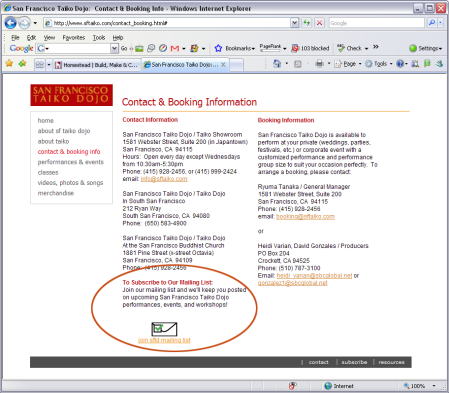
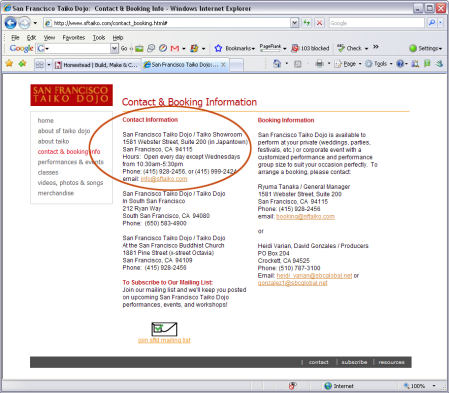
I like to think about using mailing lists in two different ways: external and internal. As an example, let’s use a site that my friend uses to manage their Japanese drum group, San Francisco Taiko Dojo http://www.sftaiko.com/contact_booking.html.

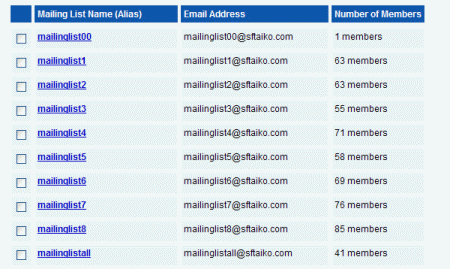
First, the more traditional, external way to use a mailing list is as a consolidation of your customers or people who might be interested in your business. In my example, we’ve created a mailing list for people who are interested in finding out about upcoming performances or concerts that San Francisco Taiko might be doing.

using a mailing list when building your website

Another way to use a mailing list is as an internal tool. If you have several people in your organization who might be responsible for the same job (e.g. answering general questions about your business or responding to sales inquiries), you might want to set up a mailing list that includes that group of people (e.g. sales@yourbusiness.com or info@yourbusiness.com) That way, if a customer sends an email to that address it will automatically go to everyone on the mailing list, and anyone would be able to answer it.

website building - contact list

Setting Up Your Mailing List

Before you add any mailing list elements to your website, you’ll need to set up your mailing list. Note that you MUST have a domain in order to set up a mailing list!

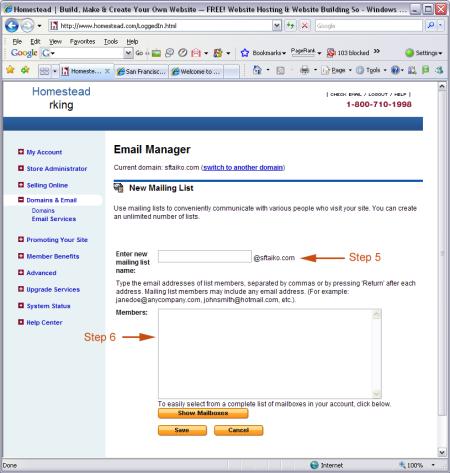
  1. Login to your account at www.homestead.com.
  2. Click the domains & email link in the left-hand menu.
  3. Click the email services link. If you have multiple domains, you may be prompted to choose the appropriate domain name. The Email Manager page will appear.
  4. Click the Create Mailing List button.
  5. Select an email address for your mailing list. This will be the address you use to send messages to your mailing list.
  6. Enter email addresses for anyone you want to receive messages you send to your mailing list. Separate the addresses with a comma, or by pressing Enter or Return on your keyboard.
  7. Click the Save button to save your mailing list.

website building - set up mailing list

Once your mailing list is saved, you can send mail to your mailing list at any time by simply entering the mailing list address (the one you created in step # 5) into your email program.

The Mailing List Elements

Now you’re ready to use the Mailing List elements that are in SiteBuilder!

website building - mailing list elements

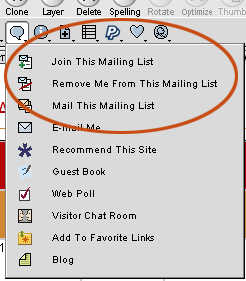
There are three elements for you to choose from:

website building - mailing list element choices

  • Join the mailing list – this element lets users automatically submit their email address to the mailing list of your choice.
  • Remove me from the mailing list – this element gives your visitors the ability to opt out of your mailing list by simply entering their email address. Keep your visitors happy by allowing them to choose the amount of e-mail they receive.
  • Mail the mailing list – use this element in conjunction with the Join the Mailing List element. That way, visitors who are interested can join and then email something to your website’s mailing list quickly and easily. Note that you may NOT want to let people email something to your mailing list so easily! This is the kind of element that might be better for a club or organization that has a password-protected page.

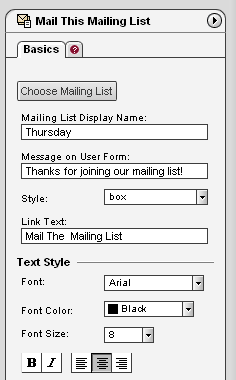
As with all elements, there are a bunch of things that you can customize on them including font, color, image used and custom messages. Just check out the Properties Editor to see what you can change:

website building - Properties Editor

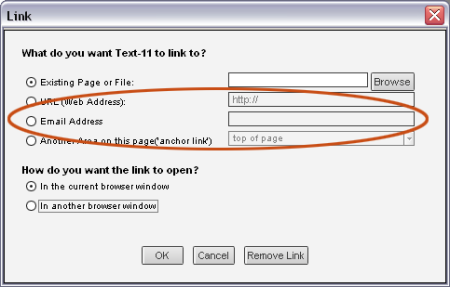
Note that you can also use text links to let people email your mailing list. Just highlight the text that you want to use as your link and use the “Email Address” option.

website building - adding a link

Hopefully you’ve found this post useful, and you can now unleash the power of Mailing Lists on your site!

Oh, one final word of caution – there’s a limit of 1500 characters for each mailing list. This roughly translates to a limit of 60 to 80 email addresses.

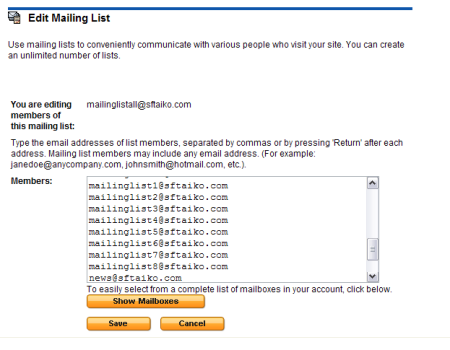
If you hit this limit, here’s a little trick that I use which I like to call “embedding mailing lists”. When I get near the limit I create a new mailing list that I name something like “MailingList2” or “MailingList3” (depending on how many mailing lists I have), that will hold any new addresses I want to add.

website building - embedding mailing lists

Then I just add that new mailing list to the original one, so that whenever I address something to the original mailing list it will include everyone on the new mailing list too!

website building - multiple mailing lists

It sounds kind of crazy, but it works!

Some pictures are worth more words than others – Part III

July 1, 2008

Ron, from our Creative Services group, is back to give you some more insight into how to use imagery more effectively in your website design – Rochelle.

In part 1 of my discussion on using images when building your website, I talked about how to choose good existing images from free resources like the Homestead Image Library. Part 2 was about dealing with copyright issues when using image services.

Today, in part 3, I’d like to talk about using your own images in your website. Taking your own photographs is probably the best way to make sure you’re getting the exact image you need for your purpose, particularly if you have an online store.

Photos of your products are arguably the single most important part of your online store. A great image gets your customers excited about your products, and gives them the confidence to complete their purchase from your store.

The great news is that it isn’t hard to take impressive photos of your products if you keep a few simple tips in mind:

  • Make your product stand out – Try using a white background to make your images jump off of the screen. Whatever background you choose, make sure that the object you’re photographing stands out against it. It’s often a good idea to use the same background consistently for all your products, so they’ll look great on the catalog page (where all the thumbnails are displayed side by side).
  • Avoid camera shake – Use a tripod to avoid moving the camera and to get the sharpest possible picture. This is especially important when using natural light.
  • Lighting is everything – Avoid using the built-in flash on your camera, especially in close-up situations; it can look harsh and flatten out the object. Turn the flash off and experiment with other methods of lighting, either using natural light or external lighting.
  • Experiment with DIY lighting – There are inexpensive lighting boxes available at photography stores, but finding other ways to diffuse light can be fun, and they don’t have to cost a lot of money. Try using two sunlight-adjusted fluorescent bulbs in clamp lights with a reflector, and aim them at a wall near the object to bounce the light onto your product.
  • Put your products on ice – My own favorite trick is to use a simple plastic ice chest or cooler as an impromptu product stage. The cooler provides a lovely even light that’s often perfect for illuminating what you put inside. Find yourself a white-lined plastic cooler large enough to fit your products, then bring it outside to a nice shady spot. Put your product inside and shoot away!
  • Get closer – Most digital cameras have a macro focus setting; use it to bring your camera within inches of your product to make sure the details are in perfect focus. This key setting is often accessed by a button that has an image of a flower on it.
  • Get creative – Finding creative ways to photograph your products can add excitement to your store. For example, instead of photographing your nature-themed jewelry on a table, imagine hanging it on branches. If you need inspiration, you can look on the Web; find ways to emulate the most inspiring product photos you can find.
  • Let software polish your images – There are many free or inexpensive software solutions out there that can help you optimize your photos to look great on the web, and they don’t have to be difficult to use. Look for programs that have simple tools to adjust brightness, contrast and size, and those that can save images to your computer in .jpg format.
  • Make your images the right size – When resizing your images for use in your online store, look at your product detail pages and choose a size that works well with the layout you have chosen. A good rule of thumb is to keep them around 300 pixels wide.
  • Do it yourself – Consider making your own thumbnail images instead of allowing the Store software to create them for you. You’ll have more control and make the smaller versions of your product photos look more sharp and crisp.

I hope these tips encourage you to try your own photographs. With very little practice you’ll find yourself taking professional-quality photos in no time!

Color me beautiful Part 2 – choosing custom colors with your visitors in mind

May 9, 2008

One of our product designers, Jerry, wrote in January about the nuts and bolts of using Homestead’s color tools. Here he is again to give you the next in his series on color: how to choose good colors for your website design – Rochelle.

Last time I talked about how to use tools like the color picker to customize your site. Now that you know how to pick colors, maybe we should talk a little about what colors you should consider using in the first place.

There are two very important characteristics of color that you should be familiar with and keep in mind as you make decisions in the design you your websites: aesthetics and usability. Both can have a profound affect on the effectiveness of your site, and they don’t always work hand in hand.

The aesthetics of color

There are many things to consider when choosing colors for a site; your preferences, the mood you want to set and your site’s message or purpose are just a few of them. These factors are unique to you and your site, and the choices you make convey a great deal to your visitors, who respond to them in their own highly individualistic way.

Colors often have personal and cultural associations to your visitors that you should try to keep in mind. Here are a few useful generalizations about some basic colors (depending on who you are, you may disagree!):

  • Red: aggressive, passionate, vital, energetic
  • Orange: fun, cheerful, exuberant, positive
  • Yellow: light, cheerful, easy going, optimistic, warm
  • Green: tranquil, fresh, healthy, deeper green associated with wealth
  • Blue: serene, dependable, secure, faithful, associated with the sky and sea
  • Purple: sophisticated, royal, mysterious, blend of passionate red and serene blue

Successfully choosing colors along aesthetic lines is a lot easier if you have an idea who your audience is and what you want to convey to them.

Beyond the more intangible aspects of color selection, there are also a few practical things to pay attention to, since your color choices also have a big impact on how easy your site is to use.

The usability of color – contrast and readability

It’s important to make sure the text on your site is readable. That means not only using the right font and text size, but also making sure there’s enough contrast between your site’s text and the background behind it. Black and white contrast nicely, but if you to use a different background or text color, things get a little trickier.

We’ve all been to websites that seemed a little color-happy; think about how you reacted to those, and whether you had trouble reading any of the text on them. Remember, it’s not enough to have your site look pretty; it needs to convey your message properly and easily too.

As a general rule, a color contrasts the most with the color on the opposite side of the color wheel, and brighter colors stand out against a darker background. You can find contrasting colors by looking at the color circle of the Color Picker, which is basically a color wheel.

building a website with color

Just keep in mind that some colors will have great contrast to each other but look ugly together. However, you can generally find contrasting colors that look good together. The best sanity check is to find a few people to look at your site and give feedback on how easy your content is to read and how good it looks.

Highlighting

Color contrast can also be used to highlight, which can be very useful when you need your users to see something specific on your site. Whatever it is you want to draw attention to should look different from everything else. The trick is to keep the “everything else” consistent throughout your site so your intended highlights pop out.

Here’s a rough guideline: use a small number of colors (four or fewer) that complement each other for each of your pages. Then have one or two highlight colors. Trying to use too many colors makes nothing stand out, since visitors perceive a difference wherever they look on your page!

Be very critical about deciding what the really important things are on your pages. You don’t always need to use color contrast to draw attention; sometimes, good layout will lead your site’s visitors to where you want them to go. Color isn’t your only tool in good design.

Colorblindness

Colorblindness should be a special consideration. About 10% of males have some form of colorblindness, the most common being some form of red-green colorblindness (blue-yellow and achromatic colorblindness are rarer). For these people, colors close to red and green appear to have much less contrast than they do to those with full color vision, so red-green combinations should be avoided where contrast is important.

An advanced class in usability

For those who want (a lot) more detail about the usability concerns related to color, NASA’s Ames Research Center has a site on color usage in critical applications such as flight. They emphasize usability and don’t really consider aesthetics. They don’t care if it’s pretty – after all, they’re designing color schemes for pilots and others who need to process data very quickly. But it can be useful reading if you’re interested.

The grain of salt

While aesthetics and usability don’t necessarily conflict (and often don’t), leaning more towards one sometimes means making compromises to the other. When making these tradeoffs, it really comes down to deciding which direction benefits your site’s message and your visitors more, as long as the tradeoff isn’t too extreme. Usually though, there is a way to accommodate both aesthetics and usability.

Things can get a little complicated with color, but if you keep the needs of your site and your visitors in mind you should have no trouble finding a good balance. If you have any specific questions, write in with your comments and I’ll try to answer them.

Introducing the new Homestead Photo Gallery

April 22, 2008

We’ve just released a new product we think you’ll like a lot. Here’s Kramer, the product designer who led the team, to tell you about it – Rochelle.

As anyone who has built a website can tell you, one of the more challenging tasks is figuring out how to effectively convey lots of information in a small amount of space, without making the page seem crammed full of extraneous stuff. I like to call this space “screen real estate”, and it’s a very valuable resource.

Large images, when viewed at their full resolution, tend to monopolize this space. Their sheer size also makes them hard to organize in groups.

A good photo gallery can solve both those problems. It can save you valuable screen space by displaying small “thumbnails” of your images (more on those later) instead of your full-size images. And those thumbnails are a lot easier to organize into groups you can use to showcase your business, products, family pictures, etc., while still providing a way to view the original images. It’s a good solution to a common problem that can also add a little flair to your website.

So we’ve added one to SiteBuilder! You’ll find the new Photo Gallery element where the outdated Photo Album element used to be, under the View Add Images and Files Elements icon in the menu above your page.

Add a Photo Gallery to your website

The old Photo Album element only allowed you to display one photo at a time in a limited fashion. Along with a host of other new features, the new Photo Gallery can exhibit tons of images on a single page; in a sense, Photo Gallery is what Photo Album wanted to be when it grew up.

If you already have a Photo Album element on your page, it will still be there, functioning as it always has, but you’ll need to add any new or additional photo groupings with the new Photo Gallery element.

Here’s how the new element works. Once you’ve put one on your page, you add images to it by simply clicking on the ‘plus’ icon in the editor on the right side of your screen. You can easily add a caption to any photo while you’re at it.

Add an image to the website you build

Keep the experience of your site visitors in mind when you consider the size of the images you are trying to upload: large images (anything larger than roughly 1 megabyte) can take a long time to load for anyone visiting your site via a slower Internet connection.

You’ll notice that the image you’ve added appears as a small, cropped version of itself. That’s the thumbnail I mentioned earlier. For those of you who aren’t familiar with the term, a thumbnail is a small piece of an image that represent the whole image that may be too large to display on a page, particularly when arranged in a group with other images.

This thumbnailing process not only preserves valuable space on your web page, but it ensures that the thumbnail will have a high resolution for ease of viewing. It can also add a little mystique to your website, as visitors won’t know what the entire image looks like until they click on it.

In the Photo Gallery element, thumbnails are formed by “center-cropping”, meaning that the center of your image is found and then a small area is taken around that center to form its thumbnail. When your visitor clicks on a thumbnail, the original full-size image will be displayed in a window superimposed on your page.

Adding additional photos to your gallery is as easy as clicking the ‘plus’ icon and selecting another image.

Once you have added multiple images to your gallery, you can modify the spacing between the images as well as the size of the thumbnails to ensure that your photo gallery will fit whatever space you need to fill on your page.

spacing your image thumbnail on your website

The thumbnailed images are automatically laid out in the Photo Gallery element in a grid format. You can customize the dimensions of your grid by simply clicking on a corner of its border and dragging it. The grid will automatically realign itself within the dimensions of your border. The examples below show the same grid shaped in two different ways by this method:

changing the photo gallery shape for your website

changing the shape of the photo gallery on your website

Once you have finished adding images to your photo gallery, check it out in your browser, or preview it in SiteBuilder.

When your visitors are viewing a full size image, they can use the right arrow key on their keyboards or click on the right side of the image to move to the next image in the gallery; the left arrow key or clicking on the left side takes them to the previous image. Please note: you won’t be able to test that effect while in SiteBuilder’s preview mode; it’s only available to visitors to your published site.

This makes it easier for the people who visit your website, because they no longer have to close each image’s window before they go to the next one. Now they can peruse your images as if they were sitting on your couch, flipping through an actual photo album!

The image display in the photo gallery on your website

Another nice feature of our Photo Gallery element is that your visitors can see the full-sized images even if they have popups blocked in their browsers. This is because the images are not opening in a new window, but rather within the same browser window. This simple difference provides a more intimate, integrated experience that can really delight visitors to your site.

Photo galleries are often best placed on a page where they are the primary focus of that page, and it’s a good idea to ensure that your images somehow relate to one another. If the first image in your gallery is of your beautiful workspace, and the next one is a picture of the Loch Ness monster, you may confuse your visitors more than they’re willing to take.

I’m really excited about our addition of the Photo Gallery element to SiteBuilder. I hope you’ll have a lot of fun with it in your own websites. Enjoy!

Using Form Elements for Fun and Profit

April 5, 2008

Here to talk about one of my favorite elements in SiteBuilder is… me! – Rochelle

People put forms on their websites for all kinds of things – collecting info from their customers or clients, soliciting feedback on their business, even taking basic orders online.  SiteBuilder’s Form Elements are some of our most powerful, since they let you set up your very own customized forms.

I think many of you are already a least a little familiar with our Form Elements, so in this post I just wanted to point out some tips and tricks that are probably not so well known. To set the stage, I’ll briefly skim over the basics first; feel free to skip ahead if you’re already familiar with them.

The Basics
Form Elements are ONLY available in SiteBuilder (not in SiteBuilder Lite).  You access them from the ‘Element Palette’ which is just below the top toolbar as shown in the following image:

  • – Select the element you want based on the kind of information that you want to collect, or the way in which you want to collect it.  For example, if you want to collect open-ended feedback from people, use a Multiple Line Textbox.  On the other hand, if you want to have people choose from a set list of options you provide them, then use a Checkbox or Option Buttons.
  • – Don’t forget to drop a Text Element for use as a label next to the form (for example, you might use a Text Element to put the label “Your Name” next to a One Line Textbox)
  • – If you’re not sure what something is, just drop it in and see what it looks like!  See what kinds of changes you can make to an element by making changes to it in the Properties Editor on the right side of the screen.
  • – You should ALWAYS include a Submit button on your form.  Otherwise, people using your form won’t have a way to send you the information you’re having them enter.

Ok, now for the more advanced stuff

Make it look good!
Forms that look good tend to have a consistent look and are laid out in a clear manner, making them easier to read and therefore easier to fill out.  Here are just a few tips to make this kind of housekeeping easier:

  • Align your elements – I’ve already blogged once before about how to align elements.  Aligning is a must with forms; they really benefit from having items within them aligned, making them much easier to read.  At Homestead, we generally right-align the labels in one column, and left-align the Form Elements as another column.
  • Style it! – Don’t forget that every element in SiteBuilder can be customized to suit your needs.  Using the Properties Editor, you can generally change the font, color and style of the text that appears in the element, as well as making certain fields required or inserting default text.
  • Extra spaces – This is a bit of a ‘hack’ but it does work: if you want to have a Form Element sized exactly right, you can always add extra spaces to a field to make it look better.

Personalize it with a custom thank you page

In addition to selecting HOW you would like to receive the feedback sent to you via your forms, one of the other most useful options for the Submit button is that you get to choose where your visitors go after they submit the form.  You can just type in a customized message, but if you really want to give your visitors a holistic experience you might consider building a “thank you” page.

How do I make sense of my form submissions!?!?!
I bet this is one of the issues I hear most about from our users, and it’s something that we haven’t perfected…yet 🙂 .  When you receive your form submissions, you can either get them sent to you via email, or as text files in the Form Manager (which you can import into Excel or some other spreadsheet program later).  Sometimes, the items may be in the wrong order or not well-labeled.  Here’s an image of a sample email delivery of a form submission with confusing content:

Now, here’s another example, this time using the technique I’m about to explain:

See how the information is better organized?   Here are a couple of tips that can help you do the same thing.  This is a little tricky to explain, so please bear with me. 

Element layer order
The order in which items in a form submission appear is based on their layer order.  The element on the lowest layer on the page is what appears at the top of the submission.  This is also what determines the “tab order” – the order in which tabbing from field to field in a form works.  So if you dropped the One Line Textbox element first, then that will be the top item in customer submissions.   To make lines of a customer submission appear in the same order as your form is laid out, do the following:

  1. Right click on the first element.
  2. Select Element Layer Order, then Bring to Front
  3. Repeat with the next element, until you’ve done this to each element in your form.

Usually, I build out the whole form and then, once I’m done, right click each Element and bring it to the front.  This will put everything in the order that you want it to appear.

Name your Elements
Use the Rename button in the Properties Editor to label your Form Elements so that the submissions make sense to you.  You can change the name of the field from “One Line Textbox-2” to something that is more meaningful, like “Name”, so your form submissions will be more clearly labeled.

See forms in action!
Check out the sample form I made to demonstrate many of the ideas I’ve talked about here: SAMPLE FORM Here’s what you’ll see:

  • – I’ve included every single Form Element just to give you an idea of what each does.  Warning!  Don’t feel compelled to use every type of form on your own site.  You won’t get any brownie points for it – only use what makes sense for your particular needs.  In the interest of being complete, I’ve also included a “Reset” button – but most people caution against using the “Reset” button since sometimes people will accidentally click it and erase everything they had entered.
  • – If you Submit your form, you’ll get to see my custom thank you page!

Since this is a fake form, feel free to click around in it and submit it (but please don’t expect a response :).

I hope these tips were helpful.  Try making a form for yourself and then test it out; sometimes experimentation is the best way to figure something out.  If it’s still confusing, feel free to leave a question in the comments section here in the blog and I’ll try to elaborate more. Have fun!

Mouseover Effects – If Only Magritte Had SiteBuilder…

March 28, 2008

magritte_notapipe.jpg

The above painting, The Treachery of Images, is by Rene Magritte. The French caption translates to “This is not a pipe”. The caption seems to contradict the subject, but not really. That’s not a pipe…it’s a picture of a pipe. You can’t stuff it with tobacco and you can’t smoke it.

OK, ready for a seamless transition from Belgian surrealist art to contemporary web design, specifically the use of buttons on websites? Here we go – consider this image:

not_button.gif

At first glance, the button label is contradictory. But upon further inspection it’s totally accurate. When you move your mouse over the image, the cursor doesn’t change into a pointing finger. And if you click on the image, nothing happens. No matter how much that image may look like a button, it just isn’t one.

Now let’s look at an actual button. As you can see, the orange image of a button shown below is also accurately labeled. When you move your mouse over the image, the cursor turns into a pointing finger. When you click this button, something happens.

In fact, let’s all click it now so we can read the rest of this post.

continue.gif