We’re updating SiteBuilder!

September 3, 2009 by

We conduct frequent user tests and review your feedback from the blog and our customer support center to plan our development, and we take it all into account (drop-down menus anyone? we hear you). We can’t talk about all that we’re planning, but we’re happy to announce that we’ve just finished an exciting update to our award-winning SiteBuilder website-building tool. Here’s product designer Jerry to tell you all about it –  Phil, Editor

We’re always trying to find ways to make it easier for you to build and maintain your websites, so based on your feedback we’re making some changes to SiteBuilder that we think will make it more efficient to use.
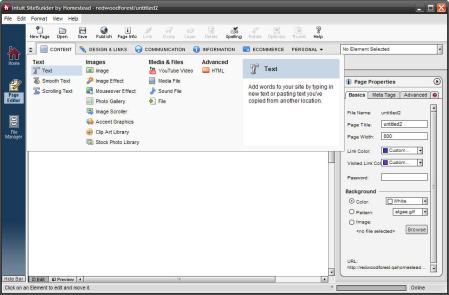
SiteBuilder website creating software - a new look

Visual Redesign

The first change is visual: when the update is made in the next few days, you’ll see that we’ve updated the icons in the toolbar at the top of SiteBuilder; same function, easier to identify icons. We’ve also refreshed the look of the element menus and shortcuts too, but that’s just the start for those…

Updated Shortcuts

SiteBuilder used to have four element shortcuts: Text, Image, Rectangle, and Site Navigation. By looking at which elements were used most frequently, we identified several that really should have a shortcut. So here’s the new list of element shortcuts: Text, Image, Photo Gallery, Media File, HTML, Rectangle, and PayPal Button.

SiteBuilder website creating software - element shortcuts

If you want some extra screen space to work on your website, you can hide and show the shortcut bar by clicking the arrow button.

To make room for this expanded list, we removed the shortcut for Site Navigation. Why? Because most people create their websites using one of our design gallery’s templates with a site navigation already built in. Of course, if you’re starting your site from scratch or need to add another site navigation menu to your site (for example, to create a footer of links), you can still find that element in SiteBuilder’s element category menu. Only now you’ll look for it in the new Design & Links category…

New Element Categories

One key thing we’re doing is reorganizing SiteBuilder’s website-building elements into new, more useful categories. As we developed new elements over time, our old categorization got outdated, with too many main categories and none with labels. We wanted to regroup elements in a more efficient way that would be easier to use.

The new menu organizes all elements in five main categories, each of which has more specific subcategories to make elements easier to find:

  • Content – Here’s where you’ll find elements for adding text, images, media content (like audio and video), and custom HTML to your site; everything you use to talk about your business in your own words, sounds, and images.
  • Design & Links – These elements create the structure of your site, including navigational structure and the overall visual design of your site.
  • Communication – This category has elements that let you interact with your customers, either through social media channels like your social networking site pages or a feed to your blog, or directly through email and chat. This category also has form elements that let you collect feedback and information from your customers.
  • Information – This category holds elements for information display like your location, time and date, and the weather.
  • E-Commerce – Anything related to selling through your website can be found here, like PayPal buttons and shopping carts, the SimpleStore add-on, and, if you have an e-commerce package, your Storefront.

Personal Elements

The five main categories hold elements that are best suited for building a professional-looking business website. The remaining elements have been given their own category called Personal Elements, because they’re often used on personal websites. If you want to access those elements, just select View > Show Personal Elements.

We know that there’ll be some adjustment for those of you who know the existing menus like the back of your hand, but we really believe that you’ll find the new categories make better sense and will be easier to learn and use.

Descriptions

Another goal of the redesign was to make it easier to understand what each element does without having to consult a help menu. In the new SiteBuilder, when you mouse over an element in the shortcuts bar or in the main menus, you’ll get a description of the element and some notes about how best to use it. If you want more detail you can always go to the Help tab (the one with the question mark on it) in the element’s properties editor, but now we’re putting the basics front and center so you can build more intuitively, and more quickly.

New Element

We’re also adding a new element called “Social Networking” to help you take advantage of the power of social networking sites to help you grow your business; we’ll be covering that in another post in a couple of days.

That’s it for now! We hope this refresh of SiteBuilder will make it even easier for you to build a great-looking website. We’ve scheduled the update for the next week, so stay tuned, and let us know what you think!
We’re making another upgrade to Storefront

August 13, 2009 by

We’re making some more improvements to our Homestead Storefront service; here’s Amr to introduce them for you.

Hello again, it’s Amr with the list of new features and other improvements we’re adding to our full-service ecommerce offering, Storefront. As in previous upgrades, we’re updating a lot of existing features, as well as creating some new ones, like adding recommended featured products to results of customer searches that don’t find specific products. We’re also improving your customers’ checkout experience.

We’ll send Storefront users an email letting them know when the upgrade will take place. In the meantime, here’s the full list of the planned improvements. If you use Storefront, be sure to review them and let us know if you have any questions!

New Features in Storefront

Merchant Tools

  • Improved One-Page Checkout: The following enhancements are being made to One-Page Checkout:
    • We’re adding buttons to clearly call out the decision that the customer needs to make next.
    • We’re moving the PayPal button down the page to show it is an option but not the primary decision the customer needs to make.
    • A lock image will inform the shopper that checkout is secure.
    • The customer will perform all actions by clicking a button.

Note: To enable improvements to One-Page Checkout, several changes are being made to the One-Page Checkout Style Sheet template. If you made any changes to this template before this Storefront upgrade takes place, your One-Page Checkout page may incorrectly render some fields. If you have problems, please contact Support for assistance.

  • New Button Images: New button images will be added on the Cart, Product List, Product Detail, and One Page Checkout pages.

Note: If you have modified your button image files without changing the image file name, Storefront’s updated images will overwrite your modified images. To retain your modified images, once the Storefront upgrade takes place, please rename your custom button image files and modify your page templates to use your renamed button image files.

eBay Listing

  • Return Policy Addition: eBay’s ‘Returns not accepted’ policy will now be supported, and tighter integration with eBay’s return policy fields will be provided.

Note: Once the Storefront upgrade takes place, if you have pending eBay listings (or eBay listing templates) you should open your existing listing (or listing template), verify that the return policy is correct, and then save the page so that the new elements will appear in your listing.

  • New Supported Payment Methods: ‘ProPay’ and ‘PayOnPickup’ will be added to the listing tool, and payment methods no longer supported on eBay will be removed. After the upgrade, Storefront will display payment methods allowed by the eBay website and the item category that the merchant selected in the listing tool.

Enhanced Shopping Experience

The following changes to the default Storefront page templates were designed to improve your customer’s shopping experience.

Note: For those of you using default Storefront page templates in your store designs, you will automatically see these changes appear in your stores when the upgrade takes place. If you previously published the template, you may not see all of these changes in your stores unless you choose the new layouts.

  • Search Results Template:
    • We’re adding recommended featured products when the customer’s search returns no product.
    • Keywords and category name are being added to page title.
  • Product Detail Template:
    • We’re improving readability by more clearly displaying critical shopping information. The new layout uses tabs to separate summary information from the long description.
    • We’re making the ‘Item added to cart’ message more prominent.
  • Shopping Cart Improvements:
    • We’re adding an image for each product in the cart. This image will be smaller than the thumbnail image.
    • The name of the product will now be a link to the product detail page.
    • We’re updating the Continue Shopping and Checkout buttons to use images, which will give the shopper a clear path to checkout.

Other Changes

  • Cybercash No Longer Supported: We’re removing Cybercash from the list of supported payment methods.
  • Dreamweaver Extension No Longer Supported: We’re removing the Dreamweaver Extension download link because Storefront will no longer support this extension. Current users may continue to use it, but without Storefront support.

Resolved Issues

  • Resolving an issue in Category Manager that could cause unexpected results when updating the priority of subcategories where many subcategories share the same name.
  • Resolving an issue that could prevent proper display of discounts for customers who are part of a customer group if the store is configured with Dedicated Customer Groups.
  • Resolving an issue that could cause an error in the product quantity when attempting to add line items to an outstanding invoice.
  • Modifying the display of the Ready for Shipping page to resolve an issue that could cause an incorrect address to appear in the Customer column of the Ready for Shipping page.
  • Resolving an issue that could cause an error when using the PayPal Direct payment method.
  • Resolving an issue that could cause an error in updating the invoice to reflect payment when the customer pays through PayPal Express.
  • Resolving an issue that could cause an error if a value of $0.00 is entered for the ‘Each Additional’ setting on a product’s configuration for Product Level Shipping.
  • Resolving an issue that caused the product preview to not include the brief or long description when adding a product.
  • Resolving an issue that caused the Sales by Product report in Report Manager to open in a new window when the user clicks the Next button.
  • Resolving an issue that could cause an extraneous zero to appear in the Sales by Customer report results.
  • Resolving an issue in the Shipping Manager that could cause an error when attempting to change shipping preferences to “configure common shipping services for all products”.
  • Resolving an issue that could cause erroneous results when performing a search.
  • Resolving an issue that caused the display of an incorrect version number in the Store Administration home page.
  • Resolving an issue that could cause the product detail page to fail to display the Sales End Date for a manufacturer OEM promotion.
  • Resolving an issue that could cause an error when attempting to check out using One-Page Checkout with gift wrapping selected.
  • Resolving an issue that could cause estimated shipping to not appear in the shopping cart when product-level shipping is enabled.
  • Resolving an issue that could cause an incorrect error message when attempting to ship an order twice.
  • Resolving an issue that caused a sitemap to be copied to a new store when a store that contains a SiteMap is modeled.
  • Resolving an issue that could cause an error in the listing ID when attempting to use Checkout Redirect with standard PayPal
  • Resolving an issue that could cause the overwriting of eBay description and detail templates with blank templates.
  • Resolving an issue that could cause invalid shipping services to appear in eBay listing setup or add product setup.
  • Resolving an issue that could cause an error when attempting to relist an eBay listing from the completed listings list.
  • Resolving an issue that could cause an error when attempting to configure a store with eBay and multi-channel inventory with the locale set to English – United Kingdom.
  • Resolving an issue in eBay setup that could cause a store name to not appear on eBay.
  • Resolving an issue in eBay setup that could cause updated values for sales tax percentage and sales tax state to fail to save.
  • Resolving an issue in eBay templates that could cause an error when attempting to add the seller zip code or payment instructions.
  • Resolving an issue in One-Page Checkout that could cause data input fields to expand past the table when viewed in the Safari 3.1 browser on MacOS.

Add a new page to your website’s navigation menu–it’s easy

April 30, 2009 by

We just streamlined the process you can use when adding a new page to your website with SiteBuilder.  Now it’s  easier to add a link in your site navigation menu to your new page. Here’s Jerry to tell you about it – Rochelle.

When you start working on creating a website, you need to decide what links to include in your site’s navigation menu. It’s important to give your site visitors an easy way to access key pages on your site with a single click, but, if you have a lot of pages, you don’t want to clutter up your navigation menu with a link to every one of them.

We’ve made it a little easier to make that decision right when you add a new page to your website.  Now when you add a new page with SiteBuilder, you’ll see a new option that makes it a simple matter to either add a link in your site navigation to your new page, or remove it. You can always add or remove a link to your new page later by editing the navigation element, but the new option makes it more convenient.

Here’s how it works. To begin, add a new page in any one of the usual ways:

1) Click the New Page button in the toolbar

2) Select File, then New Page from the menu

3) Right-click and select New Page from the File Manager

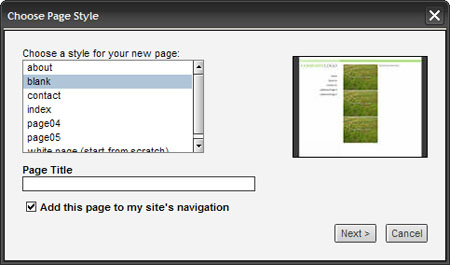
You’ll get the familiar page template selector. It looks like this if you’re using a design from our Design Gallery:

Adding a new page to your website with SiteBuilder

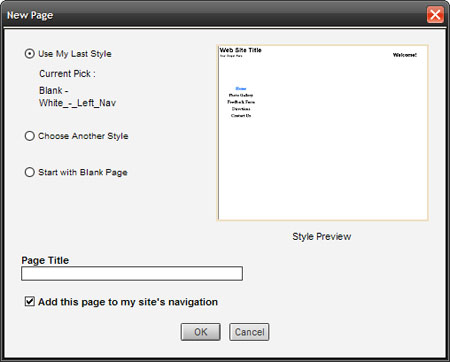
Or like this if you’re using a design from SiteBuilder:

Adding a new page to your website with SiteBuilder designs

Here’s where the new option comes in.  To add your new page to your navigation menu, make sure there is a checkmark in the box labeled ‘Add this page to my site’s navigation.’ By default, that checkbox is checked automatically; if you don’t want your new page to have a link in your navigation menu, just click the box to remove the checkmark. If you don’t have a navigation menu on your site, you won’t see that option at all.

Then make sure you give your new page a title. Search engines use page titles as part of their calculation for determining how prominently your site will appear in their search results.  Perhaps more importantly, your page title will appear as part of the link to your site in those results.

page-title1

When you’ve finished, just click Next.

The next step is deciding on the details of the link to your new page. Again, if you don’t have a navigation menu on your site, you won’t see this page.

new-page-nav1

Here’s how that works:

1) If your site has more than one navigation menu, choose the menu you want to use for your new link. Otherwise, the new page link will be automatically added to the only navigation menu on your site.

nav-menu1

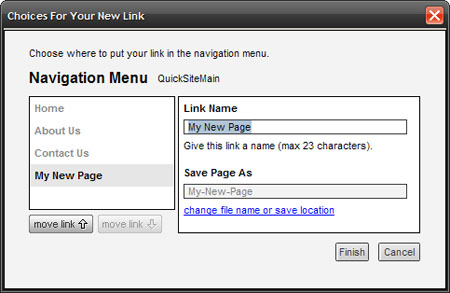
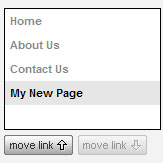
2) Next, decide where you’d like your new link to appear in your navigation menu. By default, SiteBuilder will add the new link to the end of your menu, but you can move it wherever you like in the menu by using the buttons below the list of links.

link-list1

3) Now it’s time to give your new link a name. If you gave your new page a title as I suggested, SiteBuilder will by default give the link to that page the same name.  If you prefer a different name (something shorter and more appropriate for a link, perhaps), you can change it here.

link-name1

4) To finish, you can change the name of the file for your new page, and where it will be stored. By default, SiteBuilder will use your page’s title as the page’s file name, but you can change both file name and location by clicking the change file name or save location link.

When everything looks good, just click Finish, and you’re done!

Hope this makes things easier for you.  If you have any questions about this new process, please let us know!

Website design tips from the pros

March 18, 2009 by

Some of you know that Homestead has a Design Services group that builds websites and online stores for members who want help with their designs. They’ve also analyzed a lot of other sites to suggest changes that business owners can make to maximize their results from the SearchLight marketing program. Because of what they do, they know what works well for websites and what doesn’t. The principles they follow can be useful to anyone building or maintaining a website, so I’ve invited Pamela to share some of their ideas with you – Rochelle.

Design concepts can change, but no matter how many sites we build for our members some principles remain the same. I’ve put together a list of some of them here that you can use as a guide for turning your own site into an efficient, professional online presence for your business.

Let’s start out with a couple of common website problems that can hurt your chances of converting a visitor to a customer:

  • Site is difficult to navigate — If visitors to your site can’t find their way to the information they need quickly, they’ll likely give up and look elsewhere.
  • Site looks unprofessional — If your site is cluttered or visually unappealing, it can be a turnoff to visitors and affect the way they perceive your company, no matter how successful your business actually is.

These problems are common but easy to fix:

  • Consider your site goals— What do you want your customer to do on your site? Whatever it is, make sure your home page highlights information that will help them do what you want, like your phone number if you want them to call you.
  • Optimize your layout — Recent studies show that visitors scan websites from the top left corner to the lower right. So the best place for your navigation menu is near the top of the page or vertically on the left, and make sure you keep key points about your business near the top so your visitors won’t have to scroll down to find it.
  • Keep your site design simple —Try using a standard design with a simple color scheme of 2-3 colors for all your pages, so that your logo, text, and background images have a consistent look no matter what page your customer is viewing. Visitors shouldn’t feel like they’re going to a completely different site when they navigate to another page; a site with an inconsistent look from page to page can undermine your company’s credibility.
  • Organize your site navigation — It’s easy to overload your navigation menu with too many buttons or links.  You don’t need to list every one of your pages in your navigation menu; think of it as a Table of Contents, rather than an Index. For example, if you have separate pages for different services you offer, try linking those individual service pages from one main Services page. A good basic navigation we use frequently is: Home, About Us, Services, Testimonials, and Contact Us.
  • Make your text work for you — Be concise, using just enough words for people to clearly understand what you offer without overwhelming them. Consider using bullet points to break up large amounts of text so your page will be easier to read, and use bold text sparingly; if your entire paragraph is bold, how will your visitors know what’s important?
  • Make your images look their best — Re-size your images with a photo editing tool before adding them to your site. There are many tools out there for free that can easily crop excess background so the focus of your image is clear.
  • Test your online store — If you sell things online, test your site by placing an order yourself and see what you’re asking your customers to do. Verify that the shipping and sales tax you’ve set up is correct, and that your return policies are clearly stated on your site.
  • Give visitors a reason to come back — Update your content often so that people see your site as a useful resource. One of the worst things you can do is leave outdated information on your site, like listing an event as upcoming when it has already passed. Offer your visitors fresh content and you’ll keep your site on their radar.

Remember, your website speaks for you so make sure it’s saying the right thing as efficiently as possible. If there’s one thing my team has learned, it’s that less is sometimes much, much more.

And be sure to check your Site Statistics regularly. It’s typical to see the number of visitors to your home page taper off as they navigate to other pages of your site. But if you see a severe drop-off, that’s a good sign that there’s something about your home page you need to fix so it stops turning visitors away before they can move further into your site.

I hope you find these tips helpful. Good luck with your site, and if you have any questions about design please let us know!

We’re upgrading Storefront again!

February 20, 2009 by

Our Storefront product is undergoing another big upgrade.  Once again here’s Amr from Marketing to share some of the new highlights with you – Rochelle.

Hi everyone, we’re upgrading Intuit Homestead Storefront again to give you some extra features and improve a few things at the same time. Like last time, there’s a lot we’re adding and updating, like a streamlined checkout experience for your customers and more help with using PayPal.  We thought we ought to give you the whole long list of improvements, so here’s that list:

New Features

PayPal

  • Storefront Checkout: Provides a cleaner checkout path for your customer, as well as more details on the PayPal checkout pages.
  • Billing Preferences: In multi-page checkout, when PayPal Standard is the only payment option allowed, the billing page does not appear in the checkout flow.
  • Store Administration: Provides more guidance to help you set up your PayPal preferences.
  • Payment Wizard: Improved layout and default option selection. Credit cards and other payment methods appear in multi-column tables to reduce the need to scroll through the page.

Other Changes

  • Store Administration: Provides more guidance to help you set up your PayPal preferences.
  • Security: Improved Password Strength: Passwords must now meet more stringent security requirements. Passwords and authentication meet the following criteria:
    • Contain both alphabetic and numeric characters
    • Contain at least seven characters
    • Change every ninety (90) days
    • Cannot reuse the last four passwords
    • The account will be locked after six invalid password attempts for a period of 30 minutes or until reset by an administrator
    • Sessions will time out after being idle for 15 minutes

    {Update: Oops, sorry about that, I jumped the gun on the upgraded password elements. Those will not be part of this upgrade, sorry for the confusion — Amr}

Things that have been updated

  • Resolved an issue that could cause an error when attempting to split an invoice that has a product with sizes, with one of the sizes backordered and one or more of the other sizes considered in-stock.
  • Resolved an issue that could prevent comparison shopping information from updating.
  • Resolved an issue that could cause the Sales Manager page to display code instead of the sales manager’s first and last names.
  • Resolved an issue that could cause duplicate product promotions, one active and one inactive, to be created when creating a single product promotion.
  • Resolved an issue that could cause an error when selecting FedEx delivery to Canada for residential home delivery services.
  • Resolved an issue in which the Store Settings > General Preferences Grant permission to access your eBay seller account link remained enabled after the store locale was changed to other than English (United States). This option is only available for stores with the locale set to English (United States).
  • Resolved an issue that caused the Store Admin User Attributes to not be saved when adding a user.
  • Resolved an issue that could cause a promotion-related invoice to not appear in store administration even though the customer was billed for the invoice.
  • Resolved an issue that could permit cross-site scripting to appear in a search parameters cookie.
  • Resolved an issue that could cause a template to display incorrectly after selecting “Revert to Baseline”.
  • Resolved an issue that could cause the shipping section of an eBay Pending Listing to fail to expand when selecting “Flat” or “Calculated.”

We hope these improvements will result in an even better Storefront experience for you and for your customers.  Storefront users will be getting an email shortly with more information about when the upgrade will take place.

Thanks for reading, and we hope you like the new Storefront!

Your New Year’s Resolutions

February 2, 2009 by

We recently invited a random sampling of Homestead members to take a short survey about their plans for their businesses in 2009.  Here’s Sharna with a summary of the results – Rochelle

Thank you to everybody who took part in our recent survey about members’ New Year’s resolutions for their businesses online. From the results I’ve summarized below, it looks like many of you are planning to explore new online strategies to grow your business in 2009, while still maintaining focus on what you know works. With the hope that some of these ideas may help others, here are the results of that survey:

Things you plan to start doing this year

  • Search Engine Optimization: Over 50 percent of you want to “Search Engine Optimize” your site, while only 16 percent have done it already.
  • Video: 46 percent of you plan to add video to your site, while only 14.6 percent currently have video on their sites.
  • Analyze Traffic: 45 percent of you want to start analyzing your site traffic and online advertising to improve sales; 19 percent do it already.
  • Online Directories: Over 45 percent of you are going to list your businesses in online directories, while 25 percent are already listed.
  • Email Campaigns: 50 percent of you want to start emailing your customers regularly with promotions, while only 16 percent of you are currently doing this.
  • Sell Online: 35 percent of you plan to start selling your products online; 37 percent already do it.
  • Advertise on Search Engines: 39 percent of you said that you wanted to advertise on search engines, and nearly the same percentage said it wasn’t a priority this year.
  • Gearing Website to New Customers Only: Over 20 percent of you will stop gearing your sites to new customers only, and will work to make them useful to your existing customers as well.

Things that are not a priority in 2009

  • Monitor Customer Reviews: 64 percent of you said that reading and/or responding to customer reviews on sites like Yelp.com is not a priority, and only 8 percent of you are currently doing this.
  • Start a Blog: Over 51 percent of you said you didn’t plan on starting a blog or commenting on forums related to your business, and only 16 percent do it already.
  • Advertising in Print Media: Only 24 percent of you will continue to advertise in print media like the yellow pages, 68 percent of you have never advertised in that kind of print media, and 8 percent of you said that you would stop.
  • Cleaning Up Website: 31 percent of you will continue to clean up your websites on a regular basis to make sure all links work and that your contact information is up to date, while 36 percent said that this is not a priority.
  • Targeting Global Customers: Only 5 percent of you will expand your customer targets to include global customers; 43 percent will continue to target local customers only.

That’s it for now; if you have any other ideas of your own, please let us know. And to those of you who participated, thanks!

YouWant it, YouGot it: the new YouTube video element

November 3, 2008 by

If I’ve heard our members say it once I’ve heard it a thousand times: “When are you going to make it easier for me to add a YouTube video to my site?”  I really didn’t want to start on another thousand times, so… we built it!  We’ve just added a new YouTube element to SiteBuilder; here’s Jerry, the product designer responsible for it, to tell you about it — Rochelle.

You’ve probably noticed that websites now use lots of video. Services like YouTube have made it possible to add videos to a page by copying and pasting some HTML code into it. Some of you have already used SiteBuilder’s HTML Snippet element to add a video this way.  But it ain’t easy.  Adding HTML code can be kind of complicated, and frankly it isn’t the way we wanted to make you do it.

So we built you something I think you’ll like: the new YouTube element in SiteBuilder. No need for understanding or handling HTML code anymore–adding a video to your site is as easy as copying and pasting the URL of the YouTube video from your browser’s address bar.  You’ll also be able to see how the video player will fit in with the rest of your site on the SiteBuilder stage (the draft layout you see as you work on a web page in SiteBuilder).

Let’s try it out and add a video to a web page.  First, let’s drop the YouTube element onto our site by simply clicking it in the element menu under the “add images and files” element icon:

When you first drop your element on the SiteBuilder stage, it will look like this:

Now let’s find a video on YouTube to add to our page. To get there, go to www.youtube.com in your web browser, or just click the ‘YouTube’ link in the Properties Editor.  Let’s add my favorite video of the Internet Fairy. All we have to do is highlight or select the URL in the address bar and copy it.

You’ll find the URL you need in the address bar at the top of your screen:

We simply highlight that address from the YouTube page and copy it.  Then we go back to the page we’re building in SiteBuilder, and paste that URL into the ‘YouTube URL’ field in the properties editor in SiteBuilder.

You’ll notice that the element on the stage now shows us how the player will look on our web page.  We’ll be able to see the video itself when we’re done editing our element and we preview or publish our page.

We can control the way the video behaves, too.  There may be times when you’ll want a video to begin playing automatically as soon as a visitor gets to your page. In general, though, unless the video is the main focus of the page, you’ll probably want to let your visitors decide whether or not to watch the video. This is especially true if you have more than one video on the page. So for now we’ll leave the ‘Play Automatically’ option unchecked.

You can also choose whether or not to let YouTube suggest related videos to your visitors when they’ve finished watching your video. You’ve probably seen YouTube recommendations before; they look like this:

You get to decide if other content from YouTube would be appropriate for your purposes, or whether it would be distracting.  For now, let’s leave ‘Include Related Videos’ checked.

One of the best things about using the new YouTube element to add a video is that you can now customize the player’s appearance and see the changes directly on the stage.  For our example, let’s choose a different color for our player; how about dark blue:

Here’s how that will look:

We can also add a border of the same color to outline the player more:

And then we can preview our work; notice that the video plays right on the stage:

If we like what we see, all we have to do now is publish it:

And that’s it!  Adding a video is now just a simple copy and paste from your browser to SiteBuilder. Give it a spin; I recommend starting with Ninja Cat, one of my personal favorites: [http://www.youtube.com/watch?v=muLIPWjks_M].  Have fun!

SEO tips for website builders – Review of Samantha Ostergaard Yoga

September 12, 2008 by

Our tips on Search Engine Optimization, or SEO, are among our most popular, so we asked David to pick another Homestead website customer for an SEO review.  Up this time: Samantha Ostergaard Yoga Therapy.  These tips are specifically written for that site, but the fundamentals used apply to everyone.  Happy SEO’ing! – Rochelle.

Hello again!  We’ve selected Samantha Ostergaard for our next Search Engine Optimization case study.  Samantha is a Homestead customer based in San Francisco, where she specializes in yoga therapy.

We’ve covered a lot of SEO basics in my previous posts, first with SEO checkup – Luminous Day Spa, then with Make your website search engine friendly – 3 tips for Milton Ridge.  For this post I thought I’d concentrate this entry on some slightly more advanced SEO techniques that can really help Samantha’s site, and yours.

Keyword choice

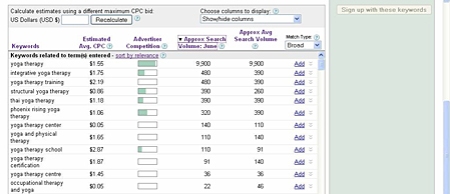
For her title tag on the front page, Samantha chose ‘yoga therapy’ as her main keyword.  There’s a really useful tool I like to use for researching how popular different keyword choices are online called the Google AdWords Keyword Tool.  It can give you advice on what keywords to consider, and now it even tells you the number of searches that were made on each!

Using that tool, this is what we find:

Google Keyword analysis for 'yoga therapy'

Keyword analysis - yoga therapy

‘Yoga therapy’ seems to be a highly competitive word, meaning that you’d have a lot of competition from other websites for people searching for that word or phrase.  What does that mean for you?  That it would be hard to stand out of the crowd of competing sites if you optimized for that phrase.

Instead, ‘integrative yoga therapy’ or ‘yoga therapy training’ might be better keywords—less competition, and still quite descriptive:

Keyword analysis - integrative yoga

Keyword analysis - integrative yoga

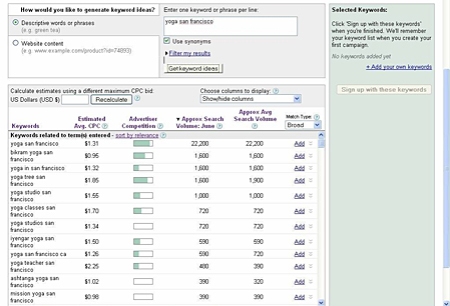
Notice that competition for ‘yoga san francisco’ is relatively fierce, but dramatically less so for a semantic version – ‘yoga in san francisco’.

Looking at Samantha’s website with this knowledge in mind, we recommend that she optimize it for this keyword string: ‘integrative yoga in san francisco ca’:

  • This works well as a description for what she has to offer, which will help get her more qualified traffic.
  • By using that string she can get her traffic from multiple keyword strings (‘yoga in san francisco’, ‘integrative yoga’ and ‘yoga san francisco ca’).
  • At the very least, we recommend that Samantha change her title tag to: ‘Samantha Ostergaard | Integrative Yoga In San Francisco CA’.

Getting links

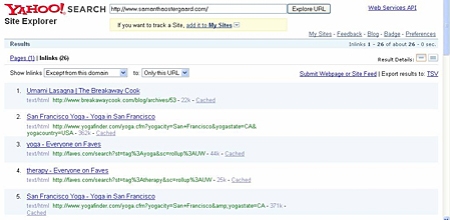
I next checked Samantha’s backlinks (incoming links to her site) using Yahoo! Site Explorer, and got these results:

Sites linking to Samantha's site

Inbound links

When I checked she had only 26 external links, mostly from faves.com and yogafinder.com. Samantha definitely needs more links, so we recommend she list her site in these directories: Yahoo Directory, Business.com, Best of the Web, Joe Ant, and the Intuit Business Directory (of course).

Remember, all links are not made equal. A link from each of the domains above is equivalent to a handful of links from smaller sites.  Always try to get a link from high-traffic, high-trust domains, or from sites that cover the same topic as your business.

Another note: while you have to pay for these links, they don’t guarantee inclusion. Your site must be professional and well-made. This is why the search engines trust them.

Get more links by participating in topical sites

As I mentioned above, links from smaller sites that are topically similar to yours are pretty good too.  To get links from these places, look for community sites where you can start engaging and participating:

  • With blogs, you can start by commenting on posts.  While links in the comments are usually not followed by search engines, they do tend to attract some traffic.  More importantly, commenting will get you noticed and hopefully featured in a post in the future.
  • With forums, your membership (and your reputation) establishes over time. Once it does, you can add a link to your own site on your forum signature.

How do you find these sites?  A simple Google search for ‘yoga forums’ or ‘yoga blogs’ is often sufficient. Another variation is using the inurl: command, which can help identify which URLs in use have certain words contained in them.  For example, if we do a Google search for ‘inurl:forum yoga’ and ‘inurl:blog yoga’, we’ll find examples of yoga sites that have ‘forum’ or ‘blog’ in their urls, which indicate that they might be yoga forums or blogs. Look them up, and see if you can participate in their communities.

Try it yourself

With just these few simple steps Samantha can increase the traffic to her website, which is always good for business.  Try these tips yourself, and see if you can’t raise the profile of your own site!

Announcing a new upgrade for Storefront!

August 7, 2008 by

Our Storefront product is undergoing a big upgrade.  Here’s Amr from Marketing to share some of the highlights with you – Rochelle.

Intuit’s top-level ecommerce offering, Homestead Storefront, is being upgraded to expand your options and make it even more useful to you and your customers.  We’re adding a lot, and updating even more, so rather than give you just a couple of the new features I thought I’d give you the whole list.

So, first off here’s what will be new:

  • One Page Checkout: One-Page checkout will give you a better way to guide your customers through the checkout process. This new checkout is streamlined compared to the old ‘Multi-Page Checkout’ which had many pages in the checkout flow. In One-Page checkout, your customers will remain on a single page with each step being completed on the left of the screen and then captured on the right of the screen in their invoice. As customers move through the checkout process, their invoice will be completed with each step.
  • Store Administration Home Page: The store administration home page will give a Quick Store Status view, and provide an easy access to your store-hosting account, resources and tools, tutorials, and more.
  • New Themes: Choose from ten new contemporary store themes.
  • New Home Page Layouts: Choose from two new home page layouts.
  • Logo Generator: If you don’t have a store logo, you’ll be able to create one in minutes using the logo generator! The logo generator will allow you to customize a clean, professional looking logo. You’ll be able to adjust the font size, color, and style, add a background, and add a tagline to your logo. Access this feature from Store Design > Logo.
  • Store Administration Product List Changes: The store administration product list will be modified with a new look and feel. Common actions such as Add Product and Search will be added to the list.
  • Unique Shipping Services for Each Product: A new shipping configuration option will be available that allows unique shipping services for each product. This option will allow you to configure up to three domestic and three international shipping services for each product. The configuration process will be very similar to shipping configuration options for eBay listings.
  • eBay Listing Templates Update: eBay Listing Templates are being updated to support new shipping fields. Important: Shipping values that were valid in the old version of Storefront may no longer be valid in the new (e.g. certain package types, shipping services, etc.), and Domestic and International will now have Insurance and Handling fields. Once the upgrade has occured, we recommend that you open each of your existing eBay Listing Templates to ensure that your shipping is configured properly.
  • Shopping Cart Cross-Sell/Up-Sell: This feature will allow you to show your customers other merchandise from your store by displaying up to six additional products on the shopping cart. Products will be displayed based on criteria that you can configure. Access this feature from Store Settings > General, under Shopping Cart and Checkout Options.
  • Product Image Resize Options: When you upload new product images, Storefront will now automatically resize them for optimal display on your Product Details and Search Results pages. Access the product image resize options from Product > List, under Product Settings.
  • Product Descriptions HTML Editor: You will now be able to enter your Product descriptions in an HTML editor while adding or updating a product.
  • New Marketing Section: You’ll be able to access all marketing tools in one convenient place. Store Promotions, E-Mail Marketing, Search Optimization, and Comparison Shopping will be located in the new Marketing section.
  • Automated Google Base Product Feed: Storefront will automatically submit your product feed to Google Base, so you can start driving traffic to your web store! No account will be needed. Access this feature from the new Marketing page.

Secondly, in addition to adding new features we’re also resolving some existing issues that may have impacted some Storefront users.  Here’s what’s being done in this area:

  • Resolving an issue that could cause an eBay Listing error if you attempted to list an item with Calculated International shipping with the Insurance option set to Optional, Required, or Included in Shipping and Handling, Domestic set to Flat, and International set to Calculated.
  • Resolving an issue that could cause an error when listing an item to eBay or when saving a Listing template, in which the Combined Shipping Discounts, Promotions and Shipping Surcharge values were not getting set or saved correctly.
  • Resolving an issue in Marketplaces in which an Image URL specified when configuring a Product would build incorrectly.
  • Resolving an issue that prevented the Shipper Number on the invoice display from allowing entry of 40 characters.
  • Resolving an issue that could cause LowInvNotifyInd to not reset to 0 after a Low Inventory notification had been sent for Attribute Products and the Attribute’s inventory was raised above the threshold.
  • Resolving a browser error that could appear on the Attributes step of the Add Product Wizard within Internet Explorer.
  • Resolving an issue that could cause Promotion Configuration errors.
  • Resolving an issue that occurred when the United States Postal Service changed the Service Description of the International delivery method of First Class Mail International to no longer include a dash (‘-‘).
  • Resolving an issue that could cause omission of the index file when copying multi-file sitemaps to the content area.
  • Resolving an issue with Copy Store Version that could cause the go.gif image used in the keyword search form to be copied with a default image instead of the appropriate one for the Theme associated with the original store version.
  • The storefront registration, customer information, customer sign-in and member logon will now use SSL encryption when checkout security is enabled.
  • Calculated product level shipping will require a minimum weight of one ounce.
  • Resolving an issue that could cause incorrect calculation of shipping discount by omitting the first item packed from the calculated discount.

That’s a lot to digest I know, but what it all boils down to is a better Storefront product for you and your customers.  We’ll be sending Storefront users an email with more information about when the upgrade will take place.

Hope you like the changes!

Making a mailing list, checking it twice…

August 5, 2008 by

After writing about the form elements a couple of weeks ago, a few people at the office suggested that I write about the mailing list elements as well. If you have a domain with email service, creating a mailing list is an excellent and easy way to keep your visitors informed about your business, club or group, and is a good tool to get them more involved as well.

Mailing List Overview

It’s easy to set up a mailing list for your website. In fact, you can set up as many mailing lists as you like. Basically, a mailing list is a collection of names which you can use to send information to multiple recipients at the same time.

I like to think about using mailing lists in two different ways: external and internal. As an example, let’s use a site that my friend uses to manage their Japanese drum group, San Francisco Taiko Dojo http://www.sftaiko.com/contact_booking.html.

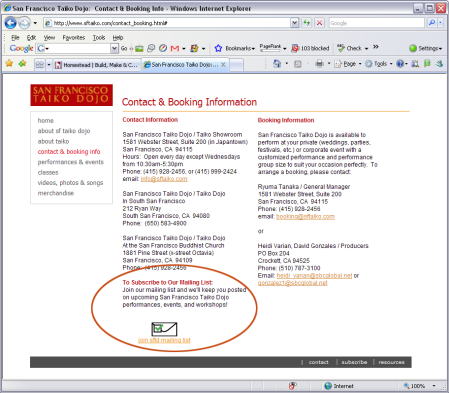
First, the more traditional, external way to use a mailing list is as a consolidation of your customers or people who might be interested in your business. In my example, we’ve created a mailing list for people who are interested in finding out about upcoming performances or concerts that San Francisco Taiko might be doing.

using a mailing list when building your website

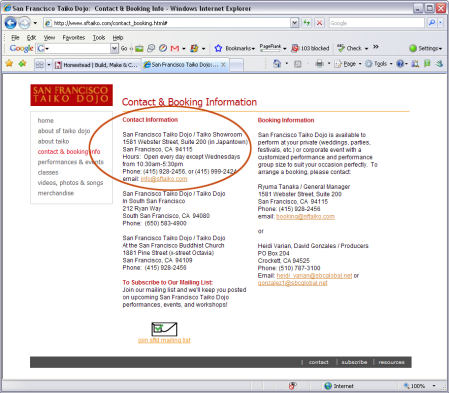
Another way to use a mailing list is as an internal tool. If you have several people in your organization who might be responsible for the same job (e.g. answering general questions about your business or responding to sales inquiries), you might want to set up a mailing list that includes that group of people (e.g. sales@yourbusiness.com or info@yourbusiness.com) That way, if a customer sends an email to that address it will automatically go to everyone on the mailing list, and anyone would be able to answer it.

website building - contact list

Setting Up Your Mailing List

Before you add any mailing list elements to your website, you’ll need to set up your mailing list. Note that you MUST have a domain in order to set up a mailing list!

  1. Login to your account at www.homestead.com.
  2. Click the domains & email link in the left-hand menu.
  3. Click the email services link. If you have multiple domains, you may be prompted to choose the appropriate domain name. The Email Manager page will appear.
  4. Click the Create Mailing List button.
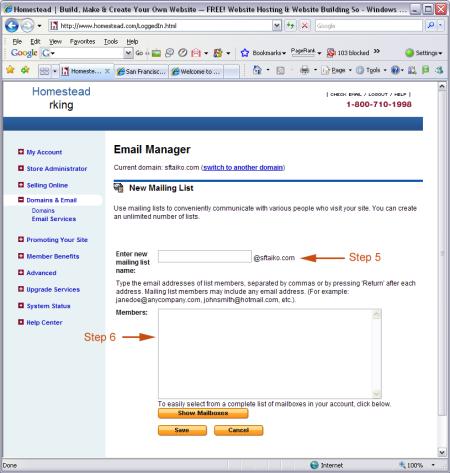
  5. Select an email address for your mailing list. This will be the address you use to send messages to your mailing list.
  6. Enter email addresses for anyone you want to receive messages you send to your mailing list. Separate the addresses with a comma, or by pressing Enter or Return on your keyboard.
  7. Click the Save button to save your mailing list.

website building - set up mailing list

Once your mailing list is saved, you can send mail to your mailing list at any time by simply entering the mailing list address (the one you created in step # 5) into your email program.

The Mailing List Elements

Now you’re ready to use the Mailing List elements that are in SiteBuilder!

website building - mailing list elements

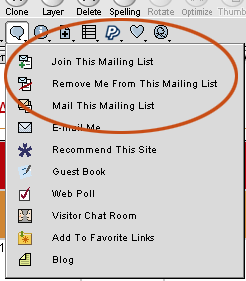
There are three elements for you to choose from:

website building - mailing list element choices

  • Join the mailing list – this element lets users automatically submit their email address to the mailing list of your choice.
  • Remove me from the mailing list – this element gives your visitors the ability to opt out of your mailing list by simply entering their email address. Keep your visitors happy by allowing them to choose the amount of e-mail they receive.
  • Mail the mailing list – use this element in conjunction with the Join the Mailing List element. That way, visitors who are interested can join and then email something to your website’s mailing list quickly and easily. Note that you may NOT want to let people email something to your mailing list so easily! This is the kind of element that might be better for a club or organization that has a password-protected page.

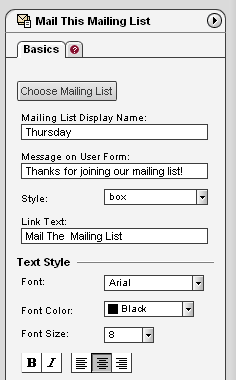
As with all elements, there are a bunch of things that you can customize on them including font, color, image used and custom messages. Just check out the Properties Editor to see what you can change:

website building - Properties Editor

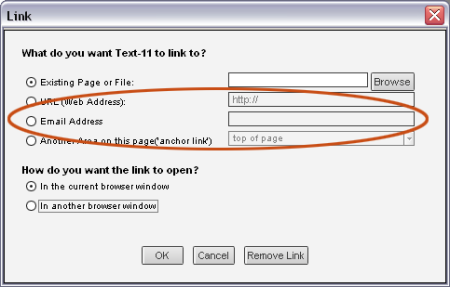
Note that you can also use text links to let people email your mailing list. Just highlight the text that you want to use as your link and use the “Email Address” option.

website building - adding a link

Hopefully you’ve found this post useful, and you can now unleash the power of Mailing Lists on your site!

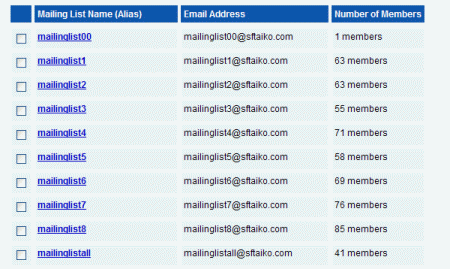
Oh, one final word of caution – there’s a limit of 1500 characters for each mailing list. This roughly translates to a limit of 60 to 80 email addresses.

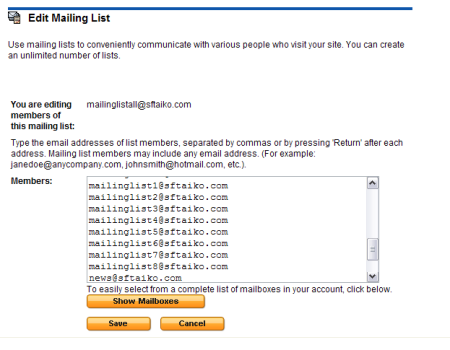
If you hit this limit, here’s a little trick that I use which I like to call “embedding mailing lists”. When I get near the limit I create a new mailing list that I name something like “MailingList2” or “MailingList3” (depending on how many mailing lists I have), that will hold any new addresses I want to add.

website building - embedding mailing lists

Then I just add that new mailing list to the original one, so that whenever I address something to the original mailing list it will include everyone on the new mailing list too!

website building - multiple mailing lists

It sounds kind of crazy, but it works!